Scripts
Blockpad's scripting language Stemscript can be used to for a lot of useful tasks, including macros, custom function modules, and modifying the file through the console.
In addition to these, in-line programs are great for creating small programs inside of the regular document. The Program{} functionality uses a sort of shorthand Stemscript that is simple to learn if you're familiar with Blockpad formulas.
In-line programs
In-line programs work inside of regular equations in the document, and they can be great for shorter calculation programming tasks.

See the in-line programs page to learn more about using program{}.
Python integration
With the Blockpad Python integration, you can run your locally installed Python from a Blockpad file.
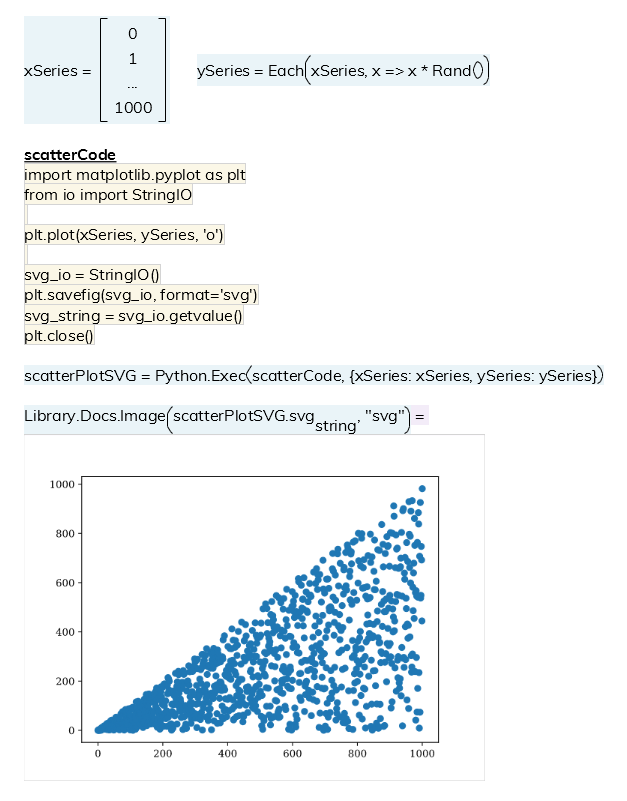
You can pass Blockpad values into a Python script to crunch numbers, generate charts and images, or anything else you can do using Python.
Learn more about how to use Python in Blockpad from the Python integration notes page.
Console basics
To open the console, select View>Show Console in the toolbar. You can also press Shift + F2.
The console is a lot like a command line editor for Blockpad. You can run equations in it and make changes to the file you are working in.
The console uses a line-by-line version of Stemscript, but because Stemscript is largely based on Blockpad's formula language, it is very similar to writing regular Blockpad equations.
For example, you can do simple math equations in the console, like in an equation. Just type the equation into the console and press enter.

Units intelligence also works in the console.

You can name variables using an equals sign, then use those variable in console equations.
Note: if the value name exists in the active frame (the report or spreadsheet tab you currently have open), then this would actually overwrite that value (see below).

You can use basically everything that you can use in equations - custom functions, matrices, complex numbers, etc.

Note that although the syntax is similar to formulas, the console is more like using a programming language than it is like a spreadsheet.
For example, if you name something twice, the second value over-writes the first.

Read values from the console
The console can read cells and values from the file you are working in.
To read a value from the console, just type in the name of the value.

You can do calculations with that value, and you can use it when creating console variables.

You can also read cells in the same way, and you can read ranges of cells that are then treated as arrays/matrices.

If the value or cell isn't in the currently active frame, then you need to specify the value location using dot notation.
So if you are currently working in Report2, but the value is in Report1, you need to type Report1.ValueName to read that value. Similarly, ff Report1 is open, and you want to read cell C4 in Sheet2, then type Sheet2.C4, etc.

Overwrite values from the console
You can use the console to assign values to cells and existing values.
When assigning values it is possible to erase or overwrite existing data, so it's important to be careful when using this feature.
To assign a value to a single cell, first type in the cell name, then an equals sign, and then the value you want to use. If the cell already has a value, then the original value will be overwritten with the new one.
This will work only if the spreadsheet you wish to write to is open. Otherwise you have to specify the sheet name infront of the cell using dot notation, e.g. Sheet2.D7 = "Bobby".

You can also write an array to a range of cells by typing the cell range (e.g. A1:A10 or B3:C5) and an equals.

You can overwrite existing values in a report in a similar way.
Type the name of the value, an equals sign, and the new value you want use. (If you use a name that doesn't exist, then the name is stored as a variable in the console, it doesn't create a new equation in the report).
Again, this only works if the report containing the value is open. If not, you need to specify the name of the report where the value is located using dot notation, e.g. Report1.B = 20 ft.
Use read and write to manipulate values
With these tools, you can read existing values in the file, run calculations on them, and then write new values to the file.
These analyses won't recalculate like normal formulas. They are more like a human reading off values, doing calcs with pen and calculator, and then typing new values in.
This can be good for different kinds of tasks, ranging from simple to complex. It's often good for the kinds of things you just need to calculate once, so you don't have a group of formulas that sit there.
The best and simplest example is assigning units to unitless numbers in a range of cells.
Assign units to numbers in a cell range
Sometime you have a group of cells in Blockpad where the numbers don't have units, but you want them to. Instead of editing each cell and manually typing in the unit, you can use the console to assign the units all at once.
To do this, you read and write to the cells in one console line.
Basically you overwrite the cell range by reading the cells and multiplying by 1, where 1 has the units you want. E.g. A1:A10 = A1:A10 * 1 ft/s^2.

If that's confusing, breaking it into a few lines might make more sense:
>    cellRange = A1:A10

>    cellRangeWithUnits = A1:A10 * 1 ft/s^2

>    A1:A10 = cellRangeWithUnits
You can use the same method to strip units, just divide by 1, where 1 has the units you want the unitless number to be in. E.g. B6:D7 = B6:D7/(5 m^2/s).
Stemscript basics for scripts
Scripts are written with Blockpad's scripting language, Stemscript.
Stemscript is based off of Javascript and Blockpad's formula language. Because it's based on the formula language, you can mostly use the same syntax as regular Blockpad equations, including the syntax for units intelligence, matrices, and built-in functions.
However, there are some differences from Blockpad equations, and a few of them are important to know before getting started with Stemscript.
Notably,
- Semicolons are required at the end of a line of code.
- For new variables, the keyword var must be used before the name of the variable.
- Blockpad libraries need to be included to use the functions inside, even basic built-in libraries like the Math library.
- For comments in the code, use two forward slash signs (i.e. //).
Semi-colons
A semicolon is needed at the end of every line of code, like in Javascript.
Basically, each line that you would be typing in the console needs a semicolon at the end. Note that a "line of code" can go across multiple lines of text in the editor. It's the semicolon that marks the actual end.
var
The keyword var must be used before each new variable, but only for new variables. If you are writing over an existing variable or a value in the document, then don't use var.
var Height = 5 in;
var Width = 2 in;
var Area = Height*Width;
Including libraries
Libraries must be included in the script in order to use common functions. To do include libraries, this line of code must be at the top of the script for each library you wish to include: include(Library.LibraryName);.
When using Blockpad scripts for the first time, it makes sense to include all of the standard libraries at the top for any new script frames.
include(Library.Math);
include(Library.Scripts);
include(Library.Text);
include(Library.Logic);
include(Library.DateTime);
include(Library.Docs);
include(Library.Geometry);
include(Library.Lookup);
include(Library.Statistics);
Comments
Finally, use two forward slashes (//) for comments, text that will not be treated as code. When there are two forward slashes in the script, any text coming after the slashes in that line of text is not calculated with the code.
// This is not code
var Height = 10 ft      //The text before these slashes is code, but this text isn't
Below is a working piece of Stemscript code that illustrates the use of semicolons, var, including libraries, and comments.
// Calculate the hypotenuse of two numbers and write it to a spreadsheet.
// This is a comment, and so not treated as code.

include(Library.Math);  // The math library is included, because the Sqrt() function is used.

var A = 3 ft;       // var is used to create a new variable, named A.
var B = 4 ft;       // the same is done for B.
var C = 0 ft;       // and C.
C = Sqrt(A^2 + B^2);    // C is overwritten here, so var isn't used
This page focuses specifically on using scripts inside of Blockpad documents and not Stemscript itself, so only the very basics are covered. For a more exhaustive resource on Stemscript, see the Stemscript page.
Turn on developer features
In order to use macros and more advanced scripting features, you must choose to show developer features.
Show developer features:
- In the toolbar, click the "App" button (the Blockpad logo to the top left).
- Select Settings.
- Check the box next to Show developer features.
- Close the settings tab.
Macros
Macros are a type of script frame that can read values, perform calculations, and overwrite values, just like you can from the console. They are good for long series of manipulations that get tedious when using just the console or for smaller calculations that you want to do many times.
Macros are written with Blockpad's scripting language, Stemscript. There are a few things you need to know about Stemscript to get started with macros, and these are in the section above.
First let's look at how to set up a macro and use some simple pre-written code.
Setting up a macro
This is the basic outline for setting up a macro:
- Insert a script frame in a document.
- Click the insert button and select Script.
- Click the dropdown that says "None" and change it to Macro.
- Type or paste in the code (more on this later).
- Click the Run button.
Let's do a simple example
Open a new Blockpad file, and insert a new spreadsheet. (insert button>Spreadsheet). Also insert a new script frame. (insert button>Script) Then change the script frame to a macro using the dropdown, paste in the following code, and click Run.
var Height = 10 ft;
var Width = 12 ft;
var Area = Height*Area;

Sheet1.B4 = "The area:";
Sheet1.C4 = Area;
After clicking Run, you should see this in Sheet1 .

Writing macros
The basic idea behind macros is to read some values in the document, run some calculation on them, and then write an output into the document. The reading and writing is similar to using the console to read and write values, but the name of the top-level frame must always be specified using dot notation (e.g. Report2.Width or Sheet3.C4:C10).
It's best to show this through examples, so below are two.
Macro example 1
Say there is a value named Volume inside a report named Properties. This value corresponds to the volume of water in a bucket, and you want to calculate the weight of the water and then write it to cell C6 in a spreadsheet named Results.
This is an example of what that macro could look like.
var vol_water = Properties.Volume;
var density_water = 62.4 lb/ft^3;

var weight_water = vol_water * density_water to lb;

Results.C6 = weight_water;
Macro example 2
As another example, say you have a range of cells (B2:B220 in Sheet1) that contain unitless numbers that represent mass values in grams. You want to summarize basic statistics of the range in Sheet2 and show the results in kilograms. Below are two different methods for this.
In both methods, the Math and Statistics libraries are included at the top, so that functions like Sum() and Median() are available. Also, a variable named massValues is created, and the range of cells is read, assigned units of grams, converted to kg, and assigned massValues.
In the first method, the output to the cells in Sheet2 is written a single cell at a time. The cells in column B are assigned a text value that labels the results. The cells in Column C show the calculated results of the different statistics functions, with massValues as the input.
include(Library.Math);
include(Library.Statistics);

var massValues = Sheet1.B2:B220 * 1g to kg;

Sheet2.B2 = "Count";
Sheet2.C2 = CountAll(massValues);

Sheet2.B3 = "Sum";
Sheet2.C3 = Sum(massValues);

Sheet2.B4 = "Average";
Sheet2.C4 = Average(massValues);

Sheet2.B5 = "Median";
Sheet2.C5 = Median(massValues);

Sheet2.B6 = "Min";
Sheet2.C6 = Min(massValues);

Sheet2.B7 = "Max";
Sheet2.C7 = Max(massValues);
In the second method, the outputs are written to a cell range all at once. The labels and calculation restults are all in an array that is assigned to the cell range.
include(Library.Math);
include(Library.Statistics);

var massValues = Sheet1.B2:B220 * 1g to kg;

Sheet2.B2:C7 = [    "Count",    CountAll(massValues);
                    "Sum",      Sum(massValues);
                    "Mean",     Average(massValues);
                    "Median",   Median(massValues);
                    "Min",      Min(massValues);
                    "Max",      Max(massValues)     ];
Note that inside the brackets, the semicolons do not signify the end of a line, but the end of a row inside the array. The "line of code" here ends with the semicolon on the outside of the bracket. So, this summaryStatistics is a two dimensional array with 2 columns and 6 rows. It's broken into multiple lines of text to be easier to read.
For both of these methods, the results in Sheet2 will look something like this.

There is a lot more you can do with macros than these simple examples, but they give an idea on how to make things work.
Basically anything you can do with Stemscript can be used in macros, so to get a feel for how to extend the information covered here take a look at the Stemscript page.
Module functions
Module functions are script-defined functions that can be used in ordinary Blockpad formulas. They are good for defining complicated calculations or for performing things better suited to programming, like long iterations.
Like macros, module functions are written with Blockpad's scripting language, Stemscript. The basics to stemscript are covered in the section above, and more syntax is covered on the Stemscript page.
Setting up a module function
To create and use a module function, you first create a script frame and write the code for it. Then you reference that script frame in a formula.
These are the basic steps:
- Insert a script frame in a document.
- Click the insert button and select Script.
- Click the dropdown that says "None" and change it to "Module".
- Type or paste in the code (more on this below).
- Click the Update button.
- Go to where you want to use the function in a formula.
- In the formula, use ScriptFrameName.FunctionName to reference the function.
Let's do a simple example
Open a new Blockpad document file, and insert a new script frame by clicking the insert button and choosing "Script". Now, double click the script frame (the top level frame listed to the left) and rename it to MyModule.
Next, change "None" to "Module" in the dropdown list at the top, paste in the code below, and then click Update.
include(Library.Math);

Module.Hypotenuse = (a, b) => {
    var c = Sqrt(a^2 + b^2);
    return c;
};
Once the module is updated, you can use the function in the report page.
Use the function in an equation by typing MyModule.Hypotenuse().
For example, 2*MyModule.Hypotenuse(3ft, 4ft) = 10 ft.
Writing modules
The syntax to set up a module looks something like the code shown below. As mentioned above, Blockpad's scripting language Stemscript is used to actually write the code.
Module.NewFunctionName = (var_1, var_2,... var_n) => {

    _Code to run using the variables_ ;

    return _Desired Result_ ;
};
The two examples below show what a working module function looks like.
Module example 1
This module finds the absolute minimum of a function within a specified domain.
Module.AbsoluteMin = (funct, x_low, x_high, resolution) => {

// Finds the absolute minimum of a function given the bounds for x values

    var step = (x_high-x_low)/resolution;
    var y_min = funct(x_low);

    for (x=x_low; x <= x_high; x += step) {

        y_x = funct(x);

        if (y_x < y_min) {
            y_min = y_x;
        }
    }

    return y_min;

};
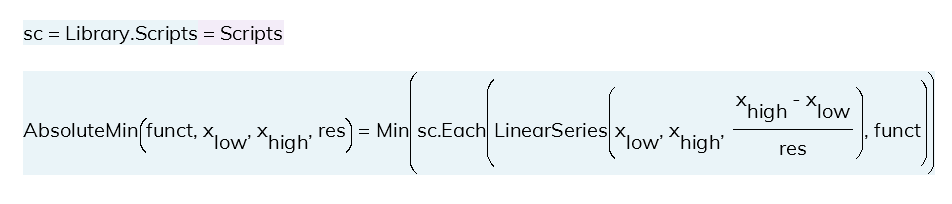
An example of how this module would be used is shown below.
Note that the module function works with units, but all of the unit math must be consistent. So, the values given for x_high and x_low must work together with the function input.
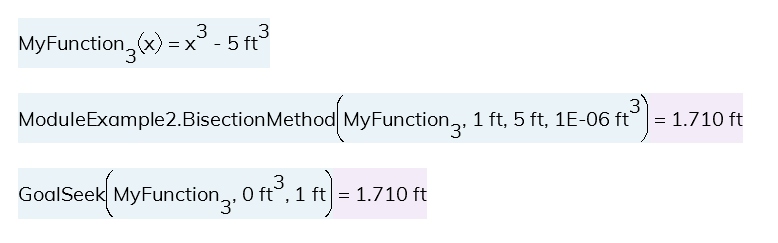
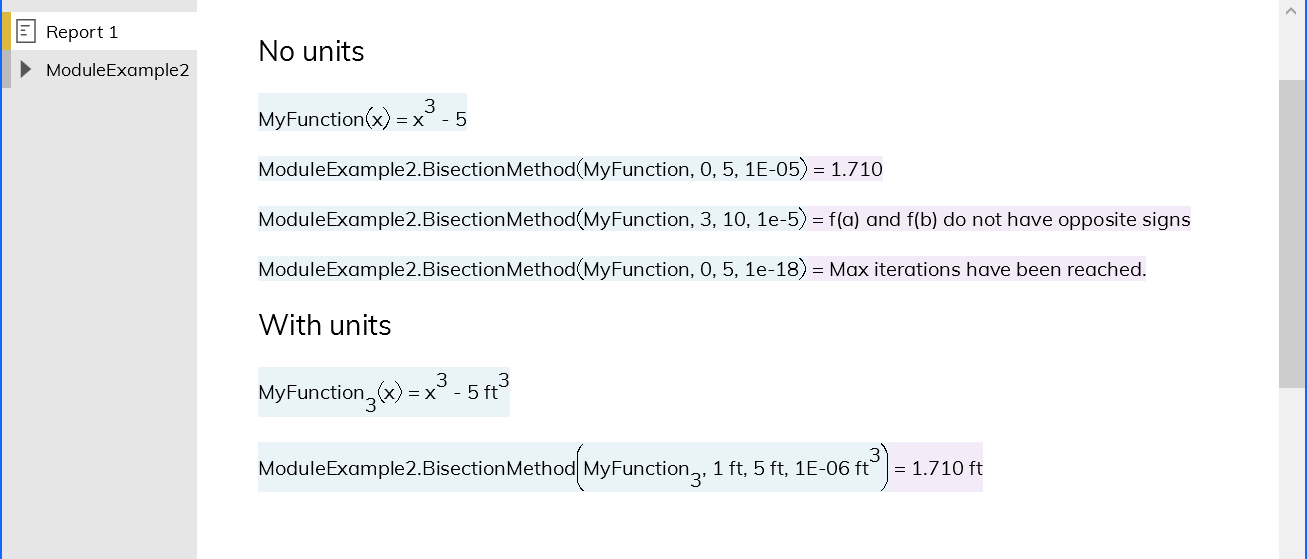
Module example 2
This module uses the bisection method to find the root of a function.
include(Library.Math);	// the math library must be included, because we use the Abs() function

Module.BisectionMethod = (funct, a, b, tol) => {

    //  The bisection method returns the x value for which f(x)=0,
    //       given f(x) and two x values on either side of the desired x value.
    //
    //  See - https://en.wikipedia.org/wiki/Bisection_method


    //  Test that f(a) and f(b) are opposite signs

    if (funct(a)*funct(b) >= 0) {
        return "f(a) and f(b) do not have opposite signs";
    }


    //   Iterate to find the root

    var MaxIterations = 1000;
    var a_ = a;
    var b_ = b;
    var c_;

    for (var i = 0; i <= MaxIterations; i += 1) {

        c_ = (a_ + b_)/2;
        f_c = funct(c_);

        if ( Abs(funct(c_)) <= tol ) {

            return c_;

        } else if ( funct(a_)*funct(c_) > 0 ) {

            a_ = c_;

        } else {

            b_ = c_;

        }

    }

    return "Max iterations have been reached.";

};
This example is shown used in a document below, with and without units.
Modules vs custom functions in equations
Module functions are great for complicated programming-style tasks, but it is often better to use ordinary custom functions to accomplish the same thing.
Ordinary custom functions have the advantage of appearing in math notation in the document with your other calcs. They can also be easier to understand for someone reading the document later, since they don't require understanding a scripting language.
The examples above do a good job to illustrate the capabilities of modules, but both examples can essentially be done with regular Blockpad equations using custom functions or existing ones.
The first example can be done with this custom function:
The second example would be more difficult to recreate with custom functions, but in practice it makes more sense to use the existing GoalSeek() function anyway.